Friday 30 November 2012

Butterflies & Brayer by Jayne Davies

Brayer inspiration by Jayne Davies


Hi all. Well this theme had me a bit beaten as I’ve never used a brayer in my paper crafting before! Still I thought I’d give it a go and this is what I came up with:


 Ingredients
SplodgeAway mat/ easy ink card and butterfly swirl mask
Persimmon, mustard seed and mowed lawn distress inks
8”x 8” card blank
Dark green card 19.5cmx 19.5cm
Copper mirricard 19cmx19cm
Copier paper
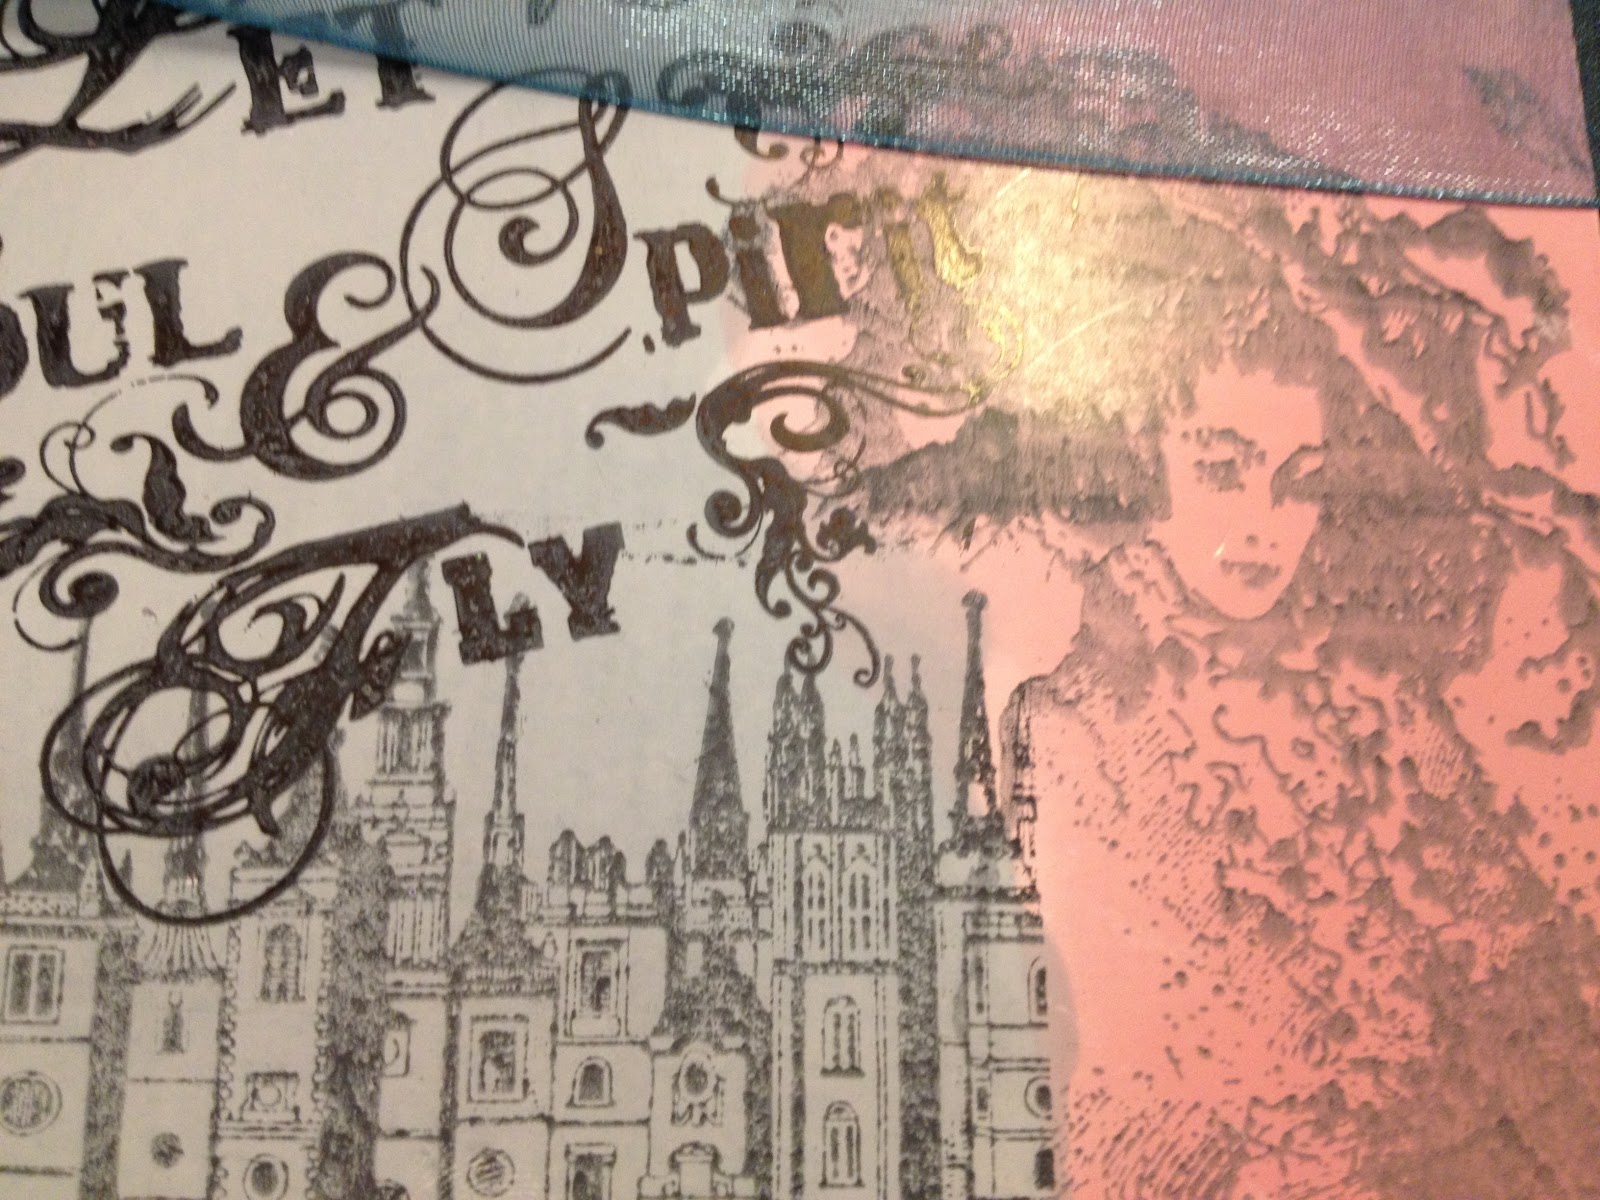
Creative expressions Art Phrases stamp set
Dark green glitter embossing powder
Copper liquid pearls
Metal butterfly charm
Versamark ink
Fancy yarn
Recipe
Layer dark green card onto front of card blank then layer the copper mirricard on top of it. Put to one side. Cut easy ink card to 18.5cmx18.5cm.  Fix it to craft surface and tear the copier paper into strips, positioning them in sequence over the easy ink card. Leave spaces in between the strips and fasten them down to surface (not onto your card!) Once all the pieces are in place lay down your 3 colours of distress ink side by side on your splodgeAway mat and ink up your brayer. Brayer the ink diagonally across the strips and card and keep inking until the desired effect is achieved.
Remove the paper strips, ink around the edges of the card and then  lightly all over to soften the harsh stripes. Ink up the butterfly mask and place face down in position on your patterned card before running it through a manual die cutting machine. Sprinkle embossing powder over it and heat set.
Stamp chosen sentiment with versamark, emboss and heat set. Wrap a few strands of the fancy yarn around the panel at the left hand side and tie in a knot, leaving long ends. Mount onto the layers on your card blank and add the butterfly charm to the yarn before trimming it to the desired length.
Finish by adding liquid pearls to highlight the butterfly images.


Like using the masks as a ‘stamp’ and embossing it – lovely effect. Why don’t you experiment with different colour combinations. Hope you like it and thanks  for looking. Hugz, Jayne xxxx


Thursday 29 November 2012

Chocolate Box by Sam Crowe


Tools Used
SplodgeAway Mat - Demonstrator
Distess Inks - Warm Lipstick, Weathered Wood - Faded Jeans
Black Archival Ink
Indigo Blu Stamps
Crafty Individuals Stamp
Clarity Stamp
Black & Pink card
Clarity A5 Coated Card Stock
Hole Punch - small
Pink Spotted Ribbon
Blue Ribbon
Hougie Board

Most of the above items were bought at Suzicraft

Project - Breyer

For this Project I wanted to try a few new techniques with the breyer and I am pleased with the results.  My theme is a vintage style Chockolate Box - by vintage, really I mean the ones we used to get as kids at xmas with them old pictures on them.

Breyering stamp image and background colour all at once.

I put my pink ink onto the mat not too much - it depends on the depth of colour your want.  So to get the striped colour and the stamp done together - Breyer your ink over the mat until it is smooth - ink up the female stamp in Black Archival ink - run the Breyer, still with the pink ink on it, over the stamp - start at either side of the stamp but make sure you get a full picture and make sure the picture doesn't overlap on the breyer.  Thats it, you could breyer upwards on a whole piece of A4 if you liked and you would get the image with the pink background all the way up your paper in a repeat pattern with abosolutely no effort whatsoever.  The lady in the corner was stamped on from the block because I only wanted one and I wanted to put the background in later so you couldn't see the "join".


The Buildings

For the next part, I did the same method of the stamp onto the Breyer but without the background ink this time, so roll you image but think about weather you are going to breyer up-over or across your page because that makes a difference with this stamp, as I was going to go across the width I brayered over the stamped image from right to left till it filled the breyer, if I was going up-over I would have brayered the stamp from the bottom up.  I knew I wanted to leave a gap in the middle though.

Now just a bit of playing around now - I ripped up a few pieces of paper, one with a straight line to mask off the ladies on the left, one to mask off the lady on the right and one for the middle piece.  Firstly I breyered the middle so placed all the lady masks over, the one on the right is not cut out but torn around the image, so you can hardly tell where the colours join.  Breyer from you mat. When you breyer always start off the paper and end off the paper so you don't see a start of finish line on your work. 

So Mask off all the ladies - and Breyer you middle section.  Finally get to straight edges of paper for the dark blue strip, either hold them down or tape them, be we are not going for a perfect straight line here just a bit of a blend.  Put a lot of ink on your SplodgeAway mat this time, this is an outline so you want it dark.


Stamp you wording at an angle in the middle in ~Black Archival ink.  And there you have it. Decorate with a blue ribbon and attach to a bock - one I made earlier - and decorate to match.  The box was made from Black and Pink card using my Hugie Board.  See Mrs Hougie for instructions.

Hope you like it, can you smell the chocolates?
Sam

Tuesday 27 November 2012

Dreams By Eileen Godwin


Eileen is so talented with her card making and we are very fortunate to have her on the SplodgeAway design team, she has used her brayer along with the SplodgeAway mat to create this stunning card


Drop by Eileens blog to see more stunning projects

Sunday 25 November 2012

Brayer Inspirations by Sue Jimson

This week the very talented SplodgeAway design team will be sharing with you projects using SplodgeAway products with a brayer.We hope you get lots of inspiration and join us too.


Hi everyone this is my project for the brayer theme. I hope you like it
Ingredients:
8x8 White Scalloped Card stock
Butterfly mask
Distress Inks - Tangled Class-Milled Lavender
Liquid Pearls in blue, purple and silver
Diamante embellishments
Brayer
Stick And Stay
Stickles Glitter

Recipe
Spray mask with 'stick and stay' so it doesn't move while you are brayering and place it on your card stock. Using the SplodgeAway mat take your distress inks and brayer and ink it up. Moving your brayer lightly across the mask cover the card stock with either the colours I have used or your preferred colours. Once you have achieved the colouring you like remove the mask. Take your liquid pearls and follow the trails of the flourishes on your card and carefully dot along them. Put some stickles glitter on the wings of the butterfly and then add your diamantes on the body of the butterfly. It's a very simple card to do but I think it really looks nice...TFL huggles Jimbo xxxx


Saturday 24 November 2012

snowflakes by Rosie

Let It Snow by Rosie.


Rosie has made a beautiful card for us she has distressed the background using the SplodgeAway mat and randomly stamped the snowflake, the central snowflake is created with nestabilities, the dew drops have been added for embellishment.

Friday 23 November 2012

Snow all around by Jayne Davies

Snow All Around by Jayne Davies
This week’s theme ‘Let It Snow’ is one of my favourites. I love that new, fresh feel the world has when everything’s under a layer of snow.


 I made this circular easel card which looks much more complicated than it actually is!

 Ingredients
SplodgeAway mat, Snow The Lot mask and Easy Ink card
8”x8” card blank
Holographic silver mirri card
Distress inks: Tumbled Glass, Stormy Sky and Faded Jeans
Molly Bloom Christmas stamp (from Christmas Inspiration pack)
Christmas sentiment stamp (from my stash)
Die of your choice to cut aperture
Spellbinders snowflake set
Self adhesive gems
Promarkers
Blue sparkly gel pen
Foam pads
Needle and thread
Recipe
Make a circular card blank by drawing a circle (I used a tea plate) on your square card blank. Make sure the circle goes off the side at the fold a bit to create the fold of your card. Fold the top half(front) in half and put to 1 side. Draw the same sized circle onto the easy ink card and cut out. We will work on the front of your card first.
Using your SplodgeAway mat lightly blend tumbles glass ink all over the panel. Place the mask onto it and, using each ink , ink through the mask, moving it each time to cover the whole panel, leaving no gaps. Add extra ink to the edges. Repeat on the inner (bottom) section.
On a spare scrap of easy ink card stamp the boy and cut out. Stamp the sentiment in faded jeans and mat onto mirri card. Colour the image using promarkers.
Adhere your panel onto mirri card and cut out, leaving a narrow border around the outside. Stick the front panel onto the bottom portion of the card front to make your easel and cut a small piece off the bottom so it will stand more easily.
With the die of your choice cut out an aperture in the card front, positioned as shown. Cut out 2 large snowflakes and stick back to back. Cut 1 medium and 2 small snowflakes and mount onto the card base as a ‘stopper’ for your easel.
Take a needle and a length of thread, Double the thread and attach to the large snowflakes. Use the needle to ‘sew ‘ it to the top of the aperture. Make sure it’s securely attached. Cover this up with a ribbon bow. Add gems around the aperture and in the middle of all the snowflakes.
To finish add the image and the sentiment using foam pads to add dimension.

                                 
Hope you like this easel and have a go yourselves. Thanks for looking. Hugz, Jayne xxxx


Thursday 22 November 2012

Monthly Challenge reminder

Dont forget you've got 6 more days for a chance to win some SplodgeAway goodies just enter our Blue and Silver challenge here

Wednesday 21 November 2012

Winter Wonderland by Sam Crowe

I hope your enjoying all of our winter themed cards, Sam has made a lovely card, she has concentrated on using the SplodgeAway mat using a brayer.


Let It Snow

Materials Used

SplodgeAway Mat
Brayer
Hougie Board
Distress Inks - Broken China, Weathered Wood, Faded Jeans
Adirondack Ink - Juniper - Meadow
Ranger Archival Black Ink - for stamping
Card Stock from Suzicraft.com
Clarity Card stock - Coated
Clarity Stamps - Village & Letterbox
Flowersoft from stash
DecoArt Glamour Dust
Craft Glue
Red Tape
3D Tape

Method

Stamp the Cottages across the middle section of the clarity A5 card (Landscape) plant one tree and one lamp post per row of houses, on each side - all the time bear in mind this is going to be equally cut into 3. (confession time) I didn't bear this in mind but it was my lucky day because the cut was just in the right place!!

Masking and Sponging - Tear 3 pieces of paper, one for ground around the houses - green grass, one for the separation of the letters and one for the sky. I mixed the sky and the bottom one around to get different directions. Start with the Meadow for the grass, put the ink on the Splodge Mat, get a sponge and make it into a "round" so there are no lines, ink up the sponge and dab off onto the mat, bring in the ink from over the top of the paper start very light first, hardly any ink, and just dab it down over or Sponge it by dabbing. Randomly around the houses and trees, etc, at various angles,  leave white in the middle which will give the impression of snow.

Brayer - Put some Juniper on Splodge Mat and directly underneath some Broken China - make sure these line up and do not exceed the width of the brayer.  Get you brayer and roll back and forth over the colours until they are blended and have disappeared into the mat.  Cover middle section of picture - we are doing the sky - put your paper at an angle starting at the corner start to brayer on your mat and across the corner of the sky and the protective paper in the middle and bray right off the other side, keep doing this and moving over toward the middle without inking again except from what you left on the mat.  Do the other corner the same holding it whichever way feels comfy.  I just tend to work backward over the opposite corner.  Move your paper up getting darker and darker, and using edge at different angles.

Do the same with the bottom part of the card after you have stamped the squares for your sentiment, remember to spread these out into three equal parts across the card. You must give you ink time to dry or lay a piece of Kitchen roll over and flatten with your hand to take excess ink without smudging.

Keep going till you are happy with the result.  Get a water spray and spray sparingly from a bit of a height over each section individually, sky, middle, bottom, as you will want different depth of effect on the sky to the middle etc.

Fill in letters, making sure none are upside down (who did that) again pat dry.  I put a mouse in one d knocked the T over as if he had thrown it out? Your choice?  The mouse is from the 12 days of Xmas stamp I just inked the mouse on its own.

I painted normal craft glue on with a flat paint brush under the houses around the hills etc and put the flowersoft on.  For the thicker snow I used the Red double sided tape and just twisted it about.  With a tiny bit of glue again paint the roof tops, the letters and the lamp post lights and put the Glamour Dust on.

Cut card evenly into 3, get out your Hougie Board measure a piece of navy A4 so that the three pictures fit evenly across you will need to trim about 1 and a half inches off one side only - excess. From middle picture measure Half centimetre, or do it by eye, tiny gap between picture and first crease, second crease measure 2" either side from centre picture and score. Fold so that the centre section pops out over and the side panels go back. Fix silver card to and 8" by 8" card stock, overlapping width ways so that you are not squashing in the centre of the picture.  Add some form of ribbon top and bottom on silver card, mine says Happy Christmas and you are done. Its best to have the card open from the bottom for added strength rather than the side.
These instructions seem rather long, well done for making it this far.

Hope you give it a go and copy SplodgeAway on Facebook to show us what you have done!
Hope you like it and it makes you get your Brayer out!
Sam

Tuesday 20 November 2012

Icicles by Sue Jimson

Brrrrrrrrr!! I'm chilly just looking at this card, Keep warm everyone.


Ingredients:
8x8 Scalloped Card
Piece of SplodgeAway Easy Ink Card
SnowThe Lot and Large Snowflake SplodgeAway Mask
Marianne Dies Icicle and Snowflakes
Pearl Embellishments
Tim Holtz Distress Inks - Weathered Wood, Salty Ocean, Tumbled Glass and Stormy Sky
Silver Liquid Pearls
Stickles
Sanding Block


Recipe:
Distress a  scalloped card using a SplodgeAway mat with weathered wood distress ink, place 'Snow The Lot' and Large Snowflake mask on Easy Ink Card and emboss using grand calibur. Cut the card down to size so there is a small border on the main card. Using the SplodgeAway mat blend weathered wood, stormy sky and salty ocean distress inks across the card then sand the card down to make it look distressed.  Cut two icicles and some snowflakes using the marianne dies and colour with distress inks.  Attach icicle die cuts to top of main card and cover with stickles. Place snowflakes around the card, use pinflair glue to make snowflakes stand up from the card and then attach pearls to middle of snowflakes, dot liquid pearls around the card to finish. I hope you like it TFL huggles xxxxxxxxxxxxxxxxxxxxxx

Sue Jimson

Sunday 18 November 2012

Let it snow by kay Foreman

Hello Splodgy Crafters. I hope you are  having fun with all your Christmas preparations, we have got a week full of Christmas fun for you, our theme is 'Let it Snow' and first to be showcased is Kay Foreman, remember to join in with us, leave us a note in the comments and we will come and visit your blog.


LET IT SNOW

Materials needed

Easy Ink Card from SplodgeAway
Blue pearlised card
A4 sheet of white card
SplodgeAway Snowflake Mask
Spellbinders Grand Nestabilities circle
Tim Holtz snowflake die
Gems
Distress Ink in Tumbled Glass
Perfect medium
Silver embossing powder
A piece of bakers twine
Let it snow stamp by butterfly kisses
Skates stamp free from stamping magazine


To start, cut out the largest circle in the grand nestabilities from white card stock then the second largest one in SplodgeAway Easy Ink card.
Run the smaller of the two through a manual embossing machine using the snowflake mask
Cut out the smallest circle using the blue pearlised card.
Distress the snowflake embossed easy ink card with your tumbled glass ink.
Glue the smallest circle into the centre of it them attach gems in the middle of the snowflakes.
Cut out snowflake die, distress edges, construct then place gem in centre Then glue to middle of circle.
Stamp skates and sentiment onto scrap white card and emboss and cut out . Using pokey tool make hole in skated and make a bow threw it with the bakers twine.
Distress in blue around the sentiment and then attach to card with foam pads. Your topper is now complete.
To make your base fold in half the largest circle. You can now attach your topper.

Just a tip. If you want to make an insert cut out a circle one size smaller than you have used for the base and when folded this fits perfect.

Happy Crafting
Kayx

Saturday 17 November 2012

Splodge & blend goes vintage by Jayne Davies

Contemporary Vintage collage by Jayne Davies


Hi all. Here’s my take on ‘splodge and blend – create a new trend! ‘


 Ingredients
Splodgeaway  mat / easy ink card
Distress inks: tumbled glass, faded jeans, chipped sapphire and stormy sky
8”x8” card blank
Silver mirricard
Indigo Blu stamp set ‘sewing mends the soul
Calligraphy stamp
Blue ribbon
Silver pearl liquid pearls
Sakura blue tiara pen (or other sparkly pen of your choice)
Post-it sticky notes

Recipe
Cut your easy ink card to 18cmx18cm and the silver mirricard to 18.5cmx18.5cm. Using your splodgeaway mat and a mixture of stormy sky ink and tumbled glass ink ink around the edges of your card blank and the outside edges of your easy ink card. Choose your central image and stamp in position using chipped sapphire ink. (using distress inks to stamp make sure it matches the rest of the project colour-wise and also adds to the distressed vintage look).
 Stick post-it notes around the edges of this image, leaving a narrow border and blend the two colours of ink as used around the edges. Continue to mask off each section, roughly to the size of your chosen images and blend as before. While the post-its are still in place each time stamp images with faded jeans distress ink and over stamp with the calligraphy stamp and tumbled glass ink. Lightly blend over any sharp ‘edges’ to soften them.


Add a ribbon to the collage and secure at the back before attaching the collage to the silver mirricard and then to the card blank. To finish off colour the central image frame with sparkly ink and add liquid pearls to the corset image.
A close-up of the central image


Hope you like my twist on the traditional vintage look and have a go with other non vintage colours as well..........orange or lime green maybe??
Thanks for looking. Hugz, Jayne xxxxxx