Tuesday 30 October 2012

SplodgeAway will be appearing on Create & Craft on 

Sunday 11th November 2012 
at 3:00pm

Please be sure to tune in for lots of new and exciting products including amazing new masks and maybe something special for Christmas.


Do you have the latest issue of Creative Stamping?  Check out page 9....


SplodgeAway will be demonstrating on the Create & Craft Stand at the Birmingham NEC on Friday 9th November at 4pm - 4:30pm.  SplodgeAway products will be available from Barbara Gray at the Clarity Stall so be sure to head her up....


SplodgeAway will be standing at the Ross Paper Craft Show in Sheffield on Sunday 18th November. So if your attending please be sure to call to our stall and say hello....

Thanks for reading. Keep on Splodging!  

Tom :o)

Sunday 28 October 2012

Happy Halloween


I was a bit stuck with the spooky theme as I haven’t got any spooky stamps so I decided to have a go with my Serif digital Software. I’ve used this software in the past to create backgrounds for cards and then added a hand stamped image but this time I tried it the opposite way round......... digitally created image with a hand created background! I was really pleased with the result.

By Jayne Davies
 
Ingredients

Splodgeaway mat/ bamboo frame mask/ build-a-pumpkin mask

Serif craft artist software and Spooktacular kit

 Spiced marmalade, rusty hinge and seedless preserves distress inks

White card

Copper mirricard

8”X8” card blank

Quickie glue pen/foam pads

Copper glitter

Black stickles

Sakura black glaze pen

Recipe

Using the serif software and spooktacular kit set the page size to 8”x8” and add a plain orange background. Place your chosen images in the centre of the page (has to fit in the frame aperture) Place your chosen sentiment at the top left and print out.

Cut out the sentiment carefully and leave to 1 side. Position the bamboo mask with the image in the central aperture and use the seedless preserves distress ink and Splodgeaway mat to ink through the mask.

On a spare piece of card ink the pumpkins of your choice and cut out.(By moving the mask around and carefully re-inking you can create ‘ribs’ on the pumpkins)

Cut out the main piece and mat and layer onto the copper mirricard and then onto the card blank. Mat the sentiment onto copper mirricard and attach to the top left corner, covering up the hole where you originally cut it from. Place the pumpkins on the bottom right using foam pads to add extra texture.

Use the quickie glue pen and copper glitter to decorate the sentiment and use black stickles to add dots around the centre panel as shown. To finish off colour over small elements of the design in the black glaze pen to add interest.

Don’t forget if you don’t have the serif software you can always make this card using any spooky stamps you have in your collection!

Thanks for looking.

Hugz, Jayne xxx


Saturday 27 October 2012


By Jimbo


8x8 Card

Black Cardstock

BooVille Halloween Papers and Words

Cosmic Shimmer Glue in Black

Stickles

Black Soot and Walnut Stain Distress Inks

SplodgeAway Mat and Blending Tool


Spooky Recipe


Attached black cardstock to my white card, then a piece of my BooVille Papers. I attached the paper and then drew a spider and a web with the cosmic shimmer black glue. I cut the words out and tore a piece of paper for the corner of my card. All the paper I edged with walnut stain using my splodgeaway mat. I covered my words in stickles to make them stand out and edged my card with black soot distress ink.

 
Happy Hauntings
 
Sue x


Friday 26 October 2012

Spooky Sights


I hope you feel this card is 'Spooky' enough! I had great fun making it and got into a bit of a mess as the same time !
By Eileen Godwin
 
 
The background border of my card was made using a Splodge-A-Mask called Oriental Bamboo, available from Suzicraft

I taped the mask down onto some white card stock with Lo Tac tape and using a small pallet knife, I applied some Glossy White Stencil Dimensions Paste. 

If you use this paste pleased ensure you wash it off your Mask at soon as you can because it starts to harden pretty quickly.
I left it overnight just to be on the safe side, that also gave me time to decide how to layout the rest of my design.

All the images are from Lavinia Stamps. I heat embossed the Fairy Lanterns but not the Fairy Castle and scattered a few Quickutz Spiders for fun! They have Rangers Black Enamel on their backs, bit like Glossy Accents.  I added some Pewter Liquid Pearls here and there and matted the finished result onto a 8'' x 8'' black card-stock base … that's it....job done.
Thanks for stopping by

Eileen

Thursday 25 October 2012

Autumn Glory Inspiration Day

Rosie has put together some inspiration for you........ Enjoyyour creative day x


By Rosie


By Rosie


By Rosie

Wednesday 24 October 2012

Autumn Glory Day 6


Project By Jimbo


8x8 White Cardstock

Piece of Easy Ink Card

Piece Of paper from craft stash

Creative Expressions Leaf Stamp

Spellbinders Label 8 Die

Liquid Pearls - Rouge

Cosmic Shimmer in Tarnished Gold

Distress Inks Fired Brick, Mustard Seed, Walnut Stain and Peeled Paint, Rusty Hinge


I inked the edge of my white cardstock with Mustard Seed distress ink, I then cut some easy ink card and stamped it with my leaf stamp and then distressed it with Rusty Hinge. I blended Fired Brick, Walnut Stain, Peeled Paint over my main image because its really bright and I wanted to mute the colours down a bit. I then cut some extra leaves from my paper and inked them and sprayed them with cosmic shimmer spray. I cut a sentiment out of the spellbinders die using easy ink and then blended distress inks over that and then cut the words of John Keats poem 'An Ode To Autumn' out and glued them to it. I dotted the liquid pearls around my card to give it a bit of shine.

 TFL huggles xxxxxxxxxxx


Tuesday 23 October 2012

Leaves In an Autumn Wind Day 5

By Alan Scott


You will need the following Crafting Items:

SplodgeAway Blending Mat
SplodgeAway mask of choice
Selection of Tim Holtz Distressing Ink Pads- Autumnal colours
Speed Ball Brayer
A4 Blank Card made up.
A4 Sheet of Water Colour White paper.
A4 Basic brown Backing Paper
Large Spellbinders die to cut out the base topper layer.
Leaf stamp with a Cranberry coloured Ink Pad.
Water Spray container.
Leaf cut out using the Cricut [if you don’t have the cricut then cut out odd numbers of leaves using a template and basic backing paper.]
6 Buttons.
Length of white Canvas Binding tape and string [These will be re-coloured using hot water and coffee]
Sentiment stamp.
Good Strong Clear Glue/Tape gun.
To make the dots l have used White and Orange Chalk Marker Pens
Paper Towel.

Using the SplodgeAway mat and your white water colour paper, start to lay down some colour. Build up the colour onto the brayer and slowly start to increase the colour across the paper in a slow method. Take your time as this is not a race. The aim is to lay down various colours across this paper covering it all in various tonal ranges.


When you are happy with the total look , next take the SplodgAway mask and lay it onto your paper. Using a water spray unit, spritz water onto the mask. We are doing this so that we can get a hint of the mask by reducing the depth of colour using water. Then quickly pick up the mask and lay it onto the lighter side of the paper and give it a good 'squish' down. We are using this as another way to introduce some water texture onto the paper. Using the paper towel just give the paper a quick dry,  but leave damp for the next step.


While the paper is still damp using a sponge and a dark distressing ink [here l used Aged Mahogany] using the same mask start to build up dots onto the paper . You will have to move the mask so that you can build up a nice range of dots. As the paper is still damp the dots will 'swell' and become blurred. I wanted this as these dots are to act as the wind to give the card movement.


When the paper is dry using your chosen metal die cut out the topper base. Now l know there are crafters out there who don’t have a single die so using a corner punch or just by simply ripping the paper will add interest.


Next step is to secure the newly made topper onto the card.


Over the years l have built up a collection of pens. There was a project that l wanted to write onto a plastic surface and l came across Chalk Pens. While they will rub off a surface using a damp cloth they are secure when it comes to paper and the white gives you a very, very good strong white something that is hard to find.


Using the same mask as we used for our topper what we want to do is take our pens and use the decorative design of the mask pattern to add more interest to the card.


Time to make yourselves a cuppa and while we are at it time to dye the binding tape and string.  Add a few teaspoons of coffee grains to hot water and then dye the string/tape. Leave for 30 minutes or so.


When you have looked at the tape and happy with the overall colour remove and gently wring out some of the coffee water, not too much as you don’t want to loose the colour. I have also in my collection a pair of ULTRA CHEAP hair tongs. These are great for ironing out ribbon and also great at drying out things just like this.


Now then what you need to be careful about is that you don’t want to iron flat these freshly coloured items. You need them to be 'crinkled and aged'.


Place them onto the card and secure into place. Please remember to go uneven when your laying down items. You always go with odds. Secure into place with your good strong clear glue and add the buttons again in 3's to cover the glue splodges.


Cut out  leaves using a cricut or template. Take a deep breath and CRUMPLE UP your carefully cut out items. The hardest part isn’t the crumpling...... it’s the unfolding. Just take your time DONT RUSH.


When all leaves have been unfolded and allowed to rest secure into place and then the last thing we need to do is make your sentiment and secure into place.


If you want to know anything about this project please leave a  message and l will do my best to help you.


Happy Crafting


Alan Scott


Monday 22 October 2012

Autumn Glory Day 4


SplodgeAway Mask, Distress Stains and Dylusions Stamps.

By Eileen Godwin
The three Bookmarks shown here were so easy to make and great fun as well.

I used lo tac tape to secure the Square Edged Lattice Mask, that is available to buy from http://www.splodgeaway.com/shop.html some watercolour paper and splodged all over with various colours of Distress Stains through the Mask … fabulous effect!

 After removing the Mask and drying my work with a heat gun, I 'sliced' the very colourful result into three bookmark shapes. 

Then I stamped over the top of them using a few Dylusions leaf images with Archival Black Ink and painted them with the Distress Stains.

My SplodgeAway Mat made a handy and convenient paint palette.


Finally, I stamped more of the leaves onto spare white card, cut a few out and stuck them on top of some of the coloured leaves, using foam pads, to add 'interest' and a bit of dimension!


I layered all three bookmarks onto more white card, added some Bakers Twine plus a Quickutz die-cut for the top of the tag.... job done ! 

So... there we are … my take on our theme today “ Autumn Glory ”

Thanks for popping by and having a look .

Eileen x


Sunday 21 October 2012

Autumn Glory Day 3


By kay Foreman


The materials I used for this card were a piece of 5x7 Splodgeaway easy ink card.

Orange and Brown card. Stamps from Joanna Sheen and Hobbby Art.

Leaves die cut

Wow powder in black sparkle

Distress inks in crushed corduroy,rusty hinge,mustard seed,wild honey and peeled paint.

Black versafine and perfect medium

circle for mask

Flowers and branch stampsby Sheena Douglass

Sentiment and birds stamps from Hobby Art


To make card I started by placing mask for sun then distressing the 5x7 white easy ink card first with mustard seed fading it towards middle of card then round the edges with wild honey and brushed corduroy. I then inked distress tool just along edge and brushed it over sun to give the effecr of cloud. I stamped the flowers along bottom in perfect medium and then embossed with wow powder. Then stamped bare branch accross top with black versafine and also the birds in fligh. I then stamped sntiment

At this stage I mated and layered the card onto orange and then brown cardstock and then glued to A5 white card in landscape position.

next I cut out assorted leaves on white cardstock useing a die cut. I then coloured with the distress ink useinf first peeled paint keeping it dark at edges and then paler toward centre then went over with rusty hinge then brushed corduroy to give the effect of autumn leaves as they are changing colour. I then placed one in the top left corner and an arrangement in the bottom right.


Hope you enjoyed looking at this card as much as I enjoyed making it.


Thanks

Kayx

Saturday 20 October 2012

Autumn Glory Day 2

By Sam Crowe


Things you will need

8" by 8" Card Stock from Suzicraft

6" by "6 paper from Papermania Happy Days range

Red Card - co'rdinates from Suzicrft

Inks : Docraft Artiste - Red

Adirondack - Meadow - Current

Alterations Dressform Die - Bought at Suzicraft

SplodgeAway Mat

SplodgeAway Masks - Poinsetta - Grass Frame

Fiskars Paisley Stamp

Habico Stamp - Vintage Swirls

Marianne die - Frame

Sentiment - Old stash

Ear-ring from my own stash

Gesso glue


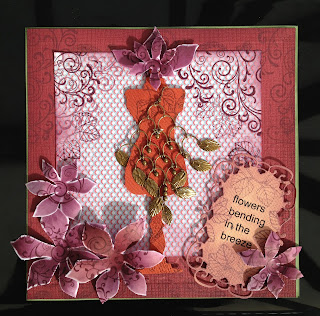
I had bought the Dressform die from suzicraft and couldn't wait to actually get round to useing it. The theme for this weeks SplodgeAway Blog is Autumn Colours - so there you go what better excuse - new clothes for Autumn?? Although I think if you went out wearing only an Earring you might get arrested???


Method


Ink the edges of the base card in the Meadow ink, cut the Co'rdinates slightly small than card, take of about 2cm off the top and 2 cm side this will give an even topper only just showing the green. Emboss co'rdinates paper with the Grass Frame SplodgeAway Mask.


Stamp the edges of the co'rdinates paper and the Happy Days paper with the Habico stamp randomly. I normally try to match stamps across papers but thought I would be daring and just make it all a bit messy!! I also stamped randomly with the Fiscars Paisley stamp, but inked it in three colours first.


Stamp over the Dress form image with the leaves - a bit Adam and Eve-ish to make an outfit. Dress it with the / or an earring. I always buy up all the cheap earrings after xmas from Boots etc. The sentiment is a rub on from a trading card set I bought in Suzicraft, cut it out with the Tag die, in ink it up with the Current on the edges and stamp the leaves onto it. Layer up your pieces, I raised the Dressform and the Tag with foam pads but the othere layers are with double sided red tape.


Get out your SplodgeAway Poinsetta Mask and ink all of them in the Current with varying degess of depth of colour. Cut them out leaving a white edge, not only does this make cutting quicker but it looks nice too, if you think you have too much white you can always ink into the edges again to cover it. Useing the central swirl stamp from Habico Stamps set stamp all the poinsettas with the swirl starting in the middle with the Current Ink, if you have too mank blank areas just add the edge of the stamp to the edge of the flower to fill it in.


Pull the fibres of the poinsetta flowers - you can do this various ways but I used a plastic medium, rounded end of a paint brush - caught the leave between my thumb and the brush stick - gently pull from the middle to the end, carefull not to tear it. Then put the flower in your hand and put the point of the stick end of the brush into the centre of the flower and swirl the brush round, this makes the flowe rise up over. Glue and position.


Extra Decoration - I used half a poinsetta and a small poinsetta to give a "hat" effect on the bodyform. And there you have it, new clothes for Autumn! Or a new card at least.


Hope you like it, I enjoyed making it.

Sam Crowe


Thursday 18 October 2012

Autumn Glory


I love the Autumn with all those gorgeous colours and crisp, fresh mornings so when this theme came up I was really looking forward to it. As I usually end up making a card I decided to go for something different and make a candle and gift box.
 
Ingredients

Splodgeaway mat/ mask/ easy ink card

Plain candle

Distress inks vintage photo, spiced marmalade and mustard seed

Alcohol inks cranberry, cocoa and lettuce

Alcohol blending solution

Spray acrylic sealer

Twine and a Button

Chestnut liquid pearls

Shiela Douglas ivy leaf embossing folder (free with crafter’s inspiration pack)

Heat resistant mat

Rubber gloves

Acetate
Spellbinders die


Recipe

As your candle is very unlikely to be exactly the same size as mine measure across the widest part of the base before you start and jot this measurement down. Then make a note of the height of your candle.

We’ll start with the candle as it will take overnight to dry properly. Protect your hands! Choose your main colour and squirt a line about 3 or 4 inches long onto your heat resistant mat. Roll your candle through it, making sure it’s fully covered. Stand it up and cover the top of the candle with your base colour. Take your other 2 colours and squeeze out colour onto the top, letting it run down the sides. Squirt a little blending solution (sparingly) onto the top and repeat with all your colours until the desired effect is achieved. Lift up by the wick and place somewhere to dry.

When making the box you need to work out how big each of the four sides needs to be. This is your measurement you jotted down + 1cm for each of the four sides +1cm extra at 1 side to join. The height of the box is the height of the candle + 1 1/2cm extra. Use the diagram below as a guide. Make sure the box is placed centrally so that the outside flaps are equal.


Once the box is cut out  use  your splodgeaway mat, apply spiced marmalade and mustard seed distress inks lightly all over the surface. Place mask over the top and apply vintage photo and some darker mustard seed through the mask. Use a die of your choice and cut an aperture with half cut from each side of the central scored line. Cut a piece of acetate slightly bigger than the aperture, score down the middle and fix to the inside of the box. Make up box, gluing the bottom flaps closed. Emboss the ivy leaves and cut out. Colour with distress inks and fix to the top and side of the box. Use liquid pearls to decorate around the aperture.

Once the candle is dry spray with the sealer and leave to dry then wrap the twine around the candle, thread through the button and tie. Add a few of the ivy leaves as before.  Place the candle in the box and glue the flaps closed.


A close up of the finished box. Don’t forget you could change the colours and decoration and make this candle as a gift from birthdays to weddings and everything in between. Have fun. Thanx  for looking. Hugz, Jayne xxxx

Monday 15 October 2012

'Great British Bake Off' Day4

Project By Sue Jimson


Well here we go for the ‘Great British Bake Off’. As everyone at Suzicraft knows I love to bake cakes so my card has a recipe for vanilla cupcakes.


Ingredients

8x8 White Cardstock

Blue Cardstock

Craft Cardstock

A piece of paper from my craft stash

Recipe pictures from Raspberry Road

Bakers Twine from Creative Expressions

Dotty Everyday SplodgeAway Mask

SplodgeAway Mat

Tumbled Glass & Tea Dye Distress Inks

Versamark Embossing Ink

Clear Embossing Powder


I edged my white cardstock with tumbled glass and tea dye distress ink, then ran my blue cardstock through the grand calibur with the dotty splodge away mask..I then stamped versa mark embossing ink all over and used clear embossing powder to make it stand out more. I then glued my recipe pictures to the craft cardstock and inked the edges with tea dye distress ink. I put bakers twine around the edge of the recipe picture. I placed my cherry paper on an angle and glued it to my blue embossed card. I then attached the recipe pictures and wrote my recipe on the card. I placed the ‘yummy’ word to the bottom of the card and that’s it basically.
Hope you like it TFL xxx huggles


--
Sue

Sunday 14 October 2012

'Great British Bake Off' Day 3

When I saw this challenge the first thing I thought of was my time spent in Suzicraft with other crafty individuals either at coffee mornings or just a crafting day. Often when we go some of us bake and my contribution is generally cup cakes. This inspired me to make this card as to me it represents Suzicraft, Splodge Away and me- I am affecionately known as 'Tea Bag' as I never refuse a cuppa


Materials needed.

Tri fold tag card blank

Splodge Away round edged lattice mask

Tim Holtz distress inks in Stormy Sky and Spun Sugar

Hobby Art set of "Time for Tea" stamps by the wonderful Jenny Meyes

A selection of Sakura Starlight pens/

Recipe printed of internet

Heart Buttton

Gingham ribbon in blue and pink

Splodge Away easy ink card

X cut die cut


Construction


Cover base card and place lattice mask over and blend in with distress inks randomly.

Cut lenghts of gingham ribbon and tie in knots through holes at top of each section of card

Stamp all elements onto easy ink card and cut outaround shape except for cake stand. This was cut out with die cut. Repeat stamp 9 of the banner shapes and stamp into the centre of each one a strawberry

Useing Sakura pens decorated cakes and tea pot etc. Botttom of cake stand and around die cut Distressed with spun sugar.


Place all elements onto card as shown

Saturday 13 October 2012

'Great British Bake Off' Day2

Receipe

SplodgeAway Mat

SplodgeAway Masks - Heart, Steam Punk Frame,

Distress Inks - Tea Dye, Walnut Stain, Vintage Photo

Docrafts Artiste Inks - Red, Dark Orange, Chocolate

Range Arcvhival Ink - Coffee for stamping

Cosmic Shimmer Mist - Anciant Copper

Creative Expressions Stamp - Weigh Anchor

Creative Expressions Stamp - Lady borrowed

Docraft "Happy Days" journaling card

Brown Card from Suzicraft, Actually almost Everything was bought at Suzicraft


For this project I asked Dimps if she happened to have a stamp with a recipe on - and she did! It is a recipe for Plum Duff - with a lady serving pudding.

So I looked up the Recipe - Plum Duff is an old recipe for a steamed pudding which was used as a treat for Sailors in the late 1800/ early 1900's - The original recipe was found and put in Mystic Seaport museum in America in 1975. It originally belonged to Sandra Oliver's Saltwater Foodways.


By Sam Crowe

 Backing Paper - get out your SplodgeAway Mat and the masks, ink over the frame first to give yourself a frame to work in. Ink in from the edges with the Distress inks Red and Dark Orange first, leave some light areas, then stamp with the Lady and Recipe stamp. Start to ink into the middle of the page with the Tea Dye and then bring in the Vintage Photo and with the Walnut Stain just darken the edges of your page. I I did add a little too much ink but just went over the original mask again with a Red and Tea Dye to darken it against the background. Play around with your other masks to get a textured look to a flat card.


Using the same stamp ink it up but wipe off all the ink on the Lady, stamp the remaining text onto the Tag, stamp edges with flourish. The hand and pen are from my stash, you can get a stamp with this image on though. Stamp the Bon Voyage overlapping the hand and onto the docraft journaling card.


Mount onto the Brown backing card and stamp edges with Anchor. Spray lightly on the left hand side with Cosmic Shimmer and glue everything into place. Stamp the lady again, cut her out and de-coupage.

This card probably has a little too much on it but sometimes a girl just has to have a good old Splodge! I hope you like it.

Sam


Friday 12 October 2012

Great British Bake Off Day 1


All this week on the SplodgeAway Blog the DT have been challenged to create a project with a receipe on. First to take up the challenge was Karen


Pumpkin Soup


There’s nothing better in this weather than a steaming hot bowl of soup, its instant warming from within.
I love pumpkin soup, so thought I would share the receipe with you, if you prefer a spicy soup you can add a teaspoon of curry powder.


The pumpkin was cut from the cricut and the vine is a SplodgeAway mask that I have embossed and distressed then hand cut.

Thursday 11 October 2012

Christmas Boudoir


By Sam Crowe


SplodgeAway Mat

Stamps by Indigu Blu - Sew1

Stamps by Hobby Craft - Various

Stamp by docraft Papermania - Happy Xmas Words

 3 Colours Xmas Inks

Stickles Black Diamond Suzicraft

Crafters Companion  Spray & Shine

Border Line - Stamp them in a way that it isn't immediately obvious that they are about sewing but to almost make them look like xmas decorations.

Merry Xmas background - use the masking method and stamp the words at random, upsidedown sideways etc just to make it look like a backing paper, use second image stamping for this too.

 Now for the Fun bit - Get out your splodgeAway Mat and put the inks onto it. Firstly Bring in the Red and work from the edge of the scissors at the bottom and work towards the left hand side of the "Ribbon Line". Once you are happy with the blending do the same for the left hand side border but turn your card around and bring your sponge onto the card from the words "The most wonderful time..." and just turn your sponge to work up to the top of the page, just work around the stamped images and keep it as close to them as you can. This gives you the border.

Background - Bring in the green and splodge to your hearts content across the middle and up to the red and just blend all your edges of the two colours in together, but do leave a slight gap of white between the colours in some areas so that it looks more like a border.

 Three items for bottom corner - I did 1 layer de-coupage on the Dress stamp and masked off the card to stamp the S across the dress to meet up with the "Dear Sants" stamp on the base card. I then put it on with foam pads and decorated it with the Stickles (at the end). I used the Candy Cane stapm in the same way - though this is not stamped underneath and then put on the Brad, feather (it just seemed to fit the era of the card) and the green ribbon to bring out the green in the background.

Top right Corner - stamp the Indigo Blu image on a piece of card, then stamp the wording so that it overlaps the lady stamp - cut out and Splodge to look aged in the Red. Overstamping like this makes it look like it is just one stamp.

 Decorate as much or as little as you like, I used the stickles but only sparcely. I wanted an antique look which wouldn't work with too much glitz on it. However - I couldn't resist useing my Spray and Shine - I think this gives a lovely finishing touch to an inked card.

 Hope you like it.

Sam Crowe

Wednesday 10 October 2012

Moments in Time Sketch Challenge


8x8 cream card

Distress Inks in Mowed Lawn and Fired Brick

SplodgeAway Easy Ink Card

Pro Markers of your own colour choice

Holly border punch

Spellbinders Poinsettia die

Butterfly kisses sentiment stamp

Grograin red ribbon

Red sparkle and matt red stickles

Spray and Sparkle

X cut shaped die cut.

Flower soft moments in time rubber stamp

pin flair glue


Distress 8x8x cream card with mowed lawn

Cut 2 and half inch depth by 8 inch wide piece of easy ink card and punch along each end with holly punch and then distress with mowed lawn

Glue along centre a piece of red grograin ribbon and secure to centre of card with glue of your choice.

Stamp Moments in Time image and colour with pro markers of your choice. Cut image out with x cut die cut then distress round edge with mowed lawn. Attach to front of card with pin flair glue to give slight raised effect.

 Using spellbinders poinsettia die cut out three flowers and colour using alternate red brick and mowed lawn then construct with pin flair glue.

Spray with spray and sparkle then when dry use stickles red sparkle in centre. Arrange in clump at bottom right of card and secure with pin flair glue.

 Stamp sentiment with mowed lawn then cut around into square shape. Distress edge with fired brick and put red stickle dots in each corner. When dry attach to top left of card using pin flair glue to give raised effect.

Thanks Kay

Tuesday 9 October 2012

White Poinsettias


Project By Rosie
What you need

8”x8” white card

Gold Card/Cream card

Spellbinders - Poinsettia Dies

Distress Inkpad – Antique Linen

Embossing Powder - Holographic

Lace, gold ribbon, gold gemstones

What to do

I cut out enough Layers of the Poinsettia Dies, to make 3 flowers, which I covered with versa mark and then dipped into the embossing powder and heat embossed using my Heat Tool. I used cosmic shimmer adhesive to layer up the flowers and stick the gem into the centre of the flower.

I cut out spellbinders Die which I will use to put my sentiment on, while still in the die I added antique linen distress ink to the centre and paper pierced through the wholes around the edge.

I used the sheet of card I had cut the flowers out of as a stencil.

Around the edges of the 8”x8” base card using Antique Linen and on my SplodgeAaway mat I blended through the Poinsettia stencil.

 I stencilled again along a 2” strip of cream card and then blended around the edges. I now put this through a crimper to give a pleated effect.

I cut a piece of cream card to 7 ½”x 7 ½”, and paper pierced around the edges of the card.

I cut the gold card to 7”x7” and rounded the corners with a punch.

I used gold ribbon to thread through my lace, before adhering it to the centre of the 2” strip.

(This type of lace is used to knit with, but the holes avail themselves for threading ribbon through.)

Finally I used pin flair adhesive to attach the sentiment and flowers.

Thank you for looking.
Rosie x

Monday 8 October 2012

Christmas Card Sketch


Twist it, flip it any way you want, but you must stick to the 3 elements grouped together, they can be any shape you wish circle, star, flowers etc, as long as there are still 3, you do not have to follow these colours, use any colour way you wish.


Project By Karen Wright
I’m using the same mask as I used a few weeks back because remember I told you it was so versatile, its fits in with this week’s Christmas theme perfectly.

I’ve used the SplodgeAway mat and fired brick distress ink to colour through the mask, after removing the mask I took forest moss I blended over the piece of card.

Using the cricut I cut out 3 stars and inked the edges with forest moss, next I assembled, matted and layered with several pieces of card. This is a real quick way of making all those Christmas cards and you don’t have to invest in lots of different patterned papers.

TFL
Karen x

Sunday 7 October 2012

First SplodgeAway Monthly Challenge


SplodgeAway Monthly Challenge number 1
Sparkle and Gems

Hello and welcome to a new feature on the blog, the first Sunday in the month will see our very own challenges set and we will have prizes every month for the winner.
The rules are pretty simple as follows
·         You must use a SplodgeAway product, be it the mat a mask or SplodgeAway card
·         Leave a link back to us on your blog
·         remember to follow the given theme
·         Above all have fun!
You can enter by Inlinkz (at the bottom of the page)

The design team will pay your blog a visit to see your amazing creations, we will notify the winner on the blog so be sure to check back to see if its you. e have now removed our comment verification to make it easier and it would help if you remove any comment verification you may have on your blog as it makes out life easier to comment, thanks.
Now onto the first SplodgeAway challenge, up for grabs this month is a selection of SplodgeAway products


we will make it an easy one for starters, as we are approaching Bonfire night, there will be plenty of bright lights and sparkles to fill the air so your challenge is to use sparkle and gems somewhere on your project.
The cut off date for entries is Midnight 28th October

Here are the Design Team cards for your inspiration, we have all used a selection of products from SplodgeAway available here


                                                                         Eileen Godwin


                                                                     Michelle Shirley


                                                                    Karen Wright


Join in the fun