 |
| By Sam Crowe |
Things you will need
8" by 8" Card Stock from Suzicraft
6" by "6 paper from Papermania Happy Days range
Red Card - co'rdinates from Suzicrft
Inks : Docraft Artiste - Red
Adirondack - Meadow - Current
Alterations Dressform Die - Bought at Suzicraft
SplodgeAway Mat
SplodgeAway Masks - Poinsetta - Grass Frame
Fiskars Paisley Stamp
Habico Stamp - Vintage Swirls
Marianne die - Frame
Sentiment - Old stash
Ear-ring from my own stash
Gesso glue
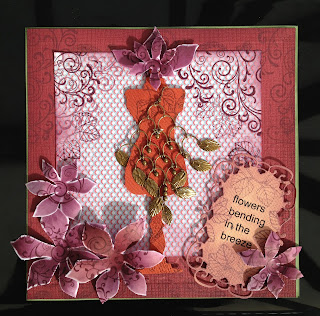
I had bought the Dressform die from suzicraft and couldn't wait to actually get round to useing it. The theme for this weeks SplodgeAway Blog is Autumn Colours - so there you go what better excuse - new clothes for Autumn?? Although I think if you went out wearing only an Earring you might get arrested???
Method
Ink the edges of the base card in the Meadow ink, cut the Co'rdinates slightly small than card, take of about 2cm off the top and 2 cm side this will give an even topper only just showing the green. Emboss co'rdinates paper with the Grass Frame SplodgeAway Mask.
Stamp the edges of the co'rdinates paper and the Happy Days paper with the Habico stamp randomly. I normally try to match stamps across papers but thought I would be daring and just make it all a bit messy!! I also stamped randomly with the Fiscars Paisley stamp, but inked it in three colours first.
Stamp over the Dress form image with the leaves - a bit Adam and Eve-ish to make an outfit. Dress it with the / or an earring. I always buy up all the cheap earrings after xmas from Boots etc. The sentiment is a rub on from a trading card set I bought in Suzicraft, cut it out with the Tag die, in ink it up with the Current on the edges and stamp the leaves onto it. Layer up your pieces, I raised the Dressform and the Tag with foam pads but the othere layers are with double sided red tape.
Get out your SplodgeAway Poinsetta Mask and ink all of them in the Current with varying degess of depth of colour. Cut them out leaving a white edge, not only does this make cutting quicker but it looks nice too, if you think you have too much white you can always ink into the edges again to cover it. Useing the central swirl stamp from Habico Stamps set stamp all the poinsettas with the swirl starting in the middle with the Current Ink, if you have too mank blank areas just add the edge of the stamp to the edge of the flower to fill it in.
Pull the fibres of the poinsetta flowers - you can do this various ways but I used a plastic medium, rounded end of a paint brush - caught the leave between my thumb and the brush stick - gently pull from the middle to the end, carefull not to tear it. Then put the flower in your hand and put the point of the stick end of the brush into the centre of the flower and swirl the brush round, this makes the flowe rise up over. Glue and position.
Extra Decoration - I used half a poinsetta and a small poinsetta to give a "hat" effect on the bodyform. And there you have it, new clothes for Autumn! Or a new card at least.
Hope you like it, I enjoyed making it.
Sam Crowe

Lovely card sam. Gorgeous colours x x x
ReplyDeleteStunning, I love it.. I love the sentiment, and flowers, and Love the embellishment, it's gorgeous xx
ReplyDeleteGorgeous card sam, loving the colours. Think you have really out done yourself on this card, and can't wait to see your next project xx
ReplyDeleteit's gorgeous Sam, wonderful use of autumnal colours and i really need that die! is it the sizzix one? love the tip for picking up jewellery in the sales too - thank you so much hugs Karen
ReplyDeleteGreat card Sam and I just love the way you use jewelry. I would never have thought of that and it looks great. Thought it was some real expensive embellishment.x
ReplyDeleteHi Karen, its the Tim Holtz Dress Form die I got mine from Suziecraft, and Kay it IS a real expensive embellishment it cost me £1.99!!!!! for the pair in Boots.
ReplyDeleteI have seen this card in 'real life' and WOW it is as stunning as it looks on the blog x
ReplyDelete