Monday 30 July 2012

Pearls and Butterfly Swirl


Wow where to start on this card, there is quite a bit going on and a bit of an experiment in parts.


Starting on the teal bazzill  I randomly stamped a crafty individuals butterfly in white ink and then also embossed it in white WOW embossing powder.  I then over stamped the same butterfly with Versamark and dusted it with mica powder.

For the focal point I took the same shade of bazzill and stamped a crafty individuals butterfly script image in white and again embossed with white wow powder, I then applied Versamark over the image and dusted various colours of mica powder over the top, then I over stamped the image in black.


Project By Karen Wright

The base card was inked in champagne encore metallic ink using a brayer and SplodgeAway mat, then using the SplodgeAway Swirly Butterfly  Mask,  I inked through it with mocha pigment ink.

For the assembly I matted onto brushed gold metallic card, mounted with 3D foam, then finished using liquid pearls to enhance the swirls on the background and enhance the butterfly image, I also gave a border of liquid pearls to the bazzill card stock.


Saturday 28 July 2012

Splodge N' Stamp Part 4.....


Project by Sam Crowe

Equipment Used

My SplodgeAway Mat
Splodge-A-Mask Heart Edges
Crafty Individuals Stamps: Bird Cage CI-320, Music CI-194
Wording Stamp - Designed by Sam Poole "SteamPuni Dreams"
Adirondack Inks : Denim / Butterscotch / Currant / Juniper
Tom Hotz Distress Ink "Aged Mahogany
All items have been bought in Suzicraft.

 I started this project on a piece of bunting because it is nice to not always work on a square or oblong. Actually a triangle is a very easy shape to work on, its obvbious from the start where the best focal point is, but you still have another three areas that you can play with as a singular area without taking the attention away from the main centre piece. I just started with one of my new and favorite stamps, the bird cage as my centrepeice, then I played with the positioning of the diamond and music stamps I just wanted to draw the eye to each area of the triangle. I then embossed the top with the SplodgeAway heart edge mask and made sure I positioned it so that there was a heart over each area where I would be adding the holes.


Then the fun begins I love to colour areas with just my inks and sponge and my SplodgeAway mat. It gives me great satisfaction when I get a good bit of shading or when I manage to highlight one particular part of a stamp with a colour but have a totally different colour right next to it without you being able to "see the join".  I did the tag too so that you can see the theme of the bunting straight away, of course the standing out bit is the flower. The blue colour stands out  and though the flower itself doesn't stand out to be too different it still gets noticed. My good crafting buddy Joan reminded me that maybe I should use some of my beads from my pile of rejected jewellry making equipment because she has been mixing them into her projects lately, thanks Joan. Anyway, I hope you like it. I am absolutely hooked on the Adirondack inks, the colours are so vibrant.


TFL
Sam Crowe


Friday 27 July 2012

Splodge N' Stamp Part 3


Project By Dimply

SplodgeAway Mat
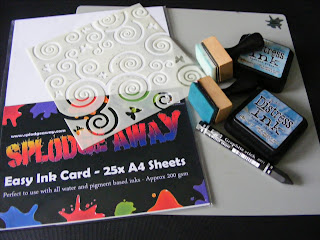
SplodgeAway Easy ink card
Blending tool

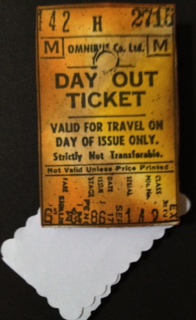
6 X 6 scalloped card
distress inks :-   victorian velvet / squeezed lemonade / antique linen

Stamps
copper mirror board

Description
Start by distressing the 6X6 card with antique linen. 
Using the script stamp, cover the A5 easy ink card to create a background paper.

Trim the mirror board to measure slightly smaller than the 6X6 card, then do the same to the Backing paper you just made.


Now stamp another image onto Easy ink then trim to size, andsame with mirror board, stamp a diffrent image and do the same again.


Assemble as liked.


Happy Crafting

Wednesday 25 July 2012

'S' is for 'Splodge N' Stamp' Part 2

Well I was sat in my craft room thinking of what to do for our 'S' for Stamping?

 I was struggling really, my mojo had gone because I think I had been so busy with the launch of SplodgeAway for Create and Craft,  which was a huge success!!

 Our summer has disappeared so I thought I would try and create something rainy and cloudy not that I want to put anyone more down in the dumps with the miserable weather LOL

 
Project By Jimbo aka Sue Jimson
Anyway this is what I came up with...I used an 8x8 card I then put some Easy Ink card through the calibur using a Butterfly and Swirls mask made by Mr SplodgeAway himself :) I love this mask its so very versatile. I used three blue distress inks one being the very appropiately named Stormy Sky and Faded Jeans and Tangled Glass these blended beautifully and so easily using the SplodgeAway mat.


I then stamped all over the card with versamark 'frost' and used a holographic embossed powder to give it a bit of a sparkle. I punched holes around the card and put some vintage twine through from creative expressions.

I used a crafty individuals stamp I bought from Suzicraft and stamped with faded blue distress ink and embossed it with cosmic shimmer ultra thick embossing powder. I attached it to some gingham cardstock which I had edged with stormy sky and another piece I tore off the edges and edged that with stormy sky distress ink.

I made a couple of clouds which I edged in stormy sky and used a creative expressions stamp for the sentiment...made a little double bow from the twine and then used the pearls in blue on the butterfly trails on the mask.


I hope you like it and I hope the next card I design has some sunshine in it.

Bye for now huggles everyone
Sue xxx

Sunday 22 July 2012

Splodge N' Distress With The Gorgeous Girls

This week on the blog we are taking a look at how the SplodgeAway Mat can help you with your stamping challenges. To kick us off I have put together a step by step of watercolouring techniques using the Distress Markers and SplodgeAway.


Use a good quality smooth watercolour paper to stamp your image onto using and archival ink pad

Lay your selected distress marker colour down on the mat. I'll give you a complete list of pens used at the end!  Spritz a little water onto your SplodgeAway Mat.

ADVICE

Before laying down any colour always use a clean damp brush to paint over the area you are wanting to paint before adding an colour. This will prevent you from getting harsh lines.
Secondly ALWAYS work on different areas to allow the colours to dry ie don't try and colour the face and the hair at the same time otherwise the colours will bleed and turn to mud!!


When you begin try not to go in too dark with your ink. Allow the colours to bleed and blend. The SplodgeAway Mat is fantastic for this type of work as the ink does not pool and run. You can pick ink up and blend on the mat without the colours running into each other. It's also great for when you want to dry brush.


The SplodgeAway Mat does not cause the ink to dry out so your palette stays fresh meaning that you can go back and darken areas and add shadows as it dries out.


Project By Annette Lee

The finished card was put together. I dry embossed some Easy Ink Card with a Splodge A Mask. Broken China DI was used to blend and highlight the embossed section of the card. The flowers were some I had left over from the Floral Mirror I did on a previous post and the sentiment is a Clarity Stamp I'm using in my next class.

Colours
Skin : Tattered Rose / Tea Dye /Worn Lipstick
Hair: Victorian Velvet /Aged Mahogany / Vintage Photo
Clothing: Broken China /  Mustard Seed

Hope You Enjoy

Annette x


Friday 20 July 2012

Monochrome Flowers


Project By Sue 'Jimbo' Jimson
 
I love to do monochrome cards so when we were asked to do something with flowers this is what I came up with.

I used 8x8 cardstock which I inked with a flourish stamp in black memento ink

7x7 black cardstock put at a jaunty angle and cut after being stuck to the card

Piece of white cardstock cut smaller and pierced around the edge

I then embossed a piece of white cardstock with floral embossibility stamped it with versamark 'frost' pad and black embossing powder and then cut an aperture out of it with the marianne oval die.


I die cut black and white card with spellbinders shapeabilities and glued them together and i die cut spellbinders spiral blossoms of different sizes in black and white and added the flowers to the card

I added pearls to the aster flowers and placed them on the card...I then made a small tag stamped it with a creative expressions sentiment and threaded through some black organza ribbon and there you have it...hope you like it :)


Thursday 19 July 2012

Flowers for Carol

"Carol"


Project By Sam Crowe


(I would like to dedicate this card to Carol Rutter, my childhood friend and Joan's Neice).

Joan is a lovely lady I met at Suzicraft, everyone likes her. She is kind and generous and loves to share her crafting goodies & ideas. She has a passion for crafting and you can often see her in the shop crafting away like a busy bee, she loves it and you can tell that she does by what she produces, even us fellow crafters ask to buy her work off her. It turns out that we had connections from the past. I asked Joan if she would make me some of her lovely flowers, at the time she was experimenting with a "Mills & Boon" if you know what I am talking about your are not 21 years old!!!!

I had set in my mind what the card was going to look like, but it ended up becoming something completely different, it became a "scrapbook card" showing the connection with myself, Joan and Carol. Joans flowers are simple but beautiful and I built the whole card around them. I hope I did them justice. I also used one of my Crafty Individuals stamps bought at www.Suzicraft.com and one of Tom's lovely spotty Masks (you will definately be seeing this on future cards)! All this was brought together with my SplodgeAway mat, Tea Dye and Black Soot distress inks. 

Did you notice that I treated myself to the Grand Nestabilities "Grand Label One" which is what I made the card with. The little stud in the tag is actually an earring, I bought up a load in Boots at Christmas when they were selling them off, I knew I would eventually find a use for them.

Does anyone want to buy 1 earring?


Sam

Tuesday 17 July 2012

SplodgeAway – Say It With Flowers by Karen Wright


This week it’s all about flowers, whatever way you want to create them there are many ways, some of which will be shown this week.

I’ve created mine using hearts cut from a cricut, however if you don’t have a cricut you can still draw them free hand and cut them out.

As you can see I’ve cut many hearts in varying sizes.


After removing the hearts from the mat I slightly crumpled and shaped them.


Taking the SplodgeAway mat and walnut distress ink I coloured all the edges of the hearts before layering and assembling them into a flower shape, a brad was added to the centre.

Taking a piece of mint green card I stamped a thanks sentiment by stampin’ up, distressed the edges  and matted this onto some brown spotty card available from Suzicraft, I then assembled the card and finished it with some leaves cut on the cricut and edged parts in stickles and liquid pearls also available from Suzicraft.

I too am waiting to see what other creations the design team come up with.


Thanks For Stopping By

Karen Wright x

Sunday 15 July 2012

SplodgeAway Floral Mirror

This week at SplodgeAway we wanted to share some inspiration about how to use your mat to create some gorgeous looks for creating your own flowers. Ladies from Maria's workshop will recognise I have added some more flowers to the mirror!


Project By Annette Lee
Some of the flowers used on the mirror were cut from the Cricut but I decided I needed a little more so here's how I made the distressed blue flowers.


Collect your crafty stash. You will also need a selection of flower punches 


 I used two DI to splodge and blend to colour an A4 piece of Easy Ink Card.
Next use your Splodge-A-Mask and Grand Calibre to emboss your card.


Hightlight the areas of embossing with a graphite pencil and punch out your chosen flowers.
Use your scraps - all the flowers made were taken from one A4 sheet of card.


Lightly spritz your larger flowers with water and scrunch up. Leave to dry or carefully open them up and dry with a heat tool - remember DO NOT USE HEAT ON SPLODGEAWAY MAT


 I used a hot glue gun with a tiny amount of glue to stick layers together. Bling and Cosmic Pearlescent Glue was added to the centre of the flowers.

Thanks For Looking

Annette x

Monday 9 July 2012

New York New York

Welcome to all our new followers here on SplodgeAway - hopefully we will get to know you.

I just wanted to post a message here to say that due to the demand over at SplodgeAway.com for the SplodgeAway products the web site has gone into melt down and is currently receiving First Aid. Once the life support has kicked in - normal service will resume.

Annette x

Our theme for this week is 'Put A Song in It' Here's Sue's take on the title...........

Today's card for the 'Put A Song In It' theme is based on my trip to New York and of course my hubby's favourite song 'New York New York'


I basically used the hearts and cogs mask, this was ideal because I wanted a huge heart. I embossed it twice on easy ink paper and cut them both out...then distressed them in four different colours of distress ink using the 'can't do without' SplodgeAway' mat which just goes to show how they blended together beautifully.
The first heart was covered with Versamark ink and heat embossed with clear embossing powder. The second was distressed around the edges and then sprayed with cosmic shimmer Vintage Gold Mist and torn in half. The added wrapped shoe lace adds a touch of humour (as you walk miles in New York...... LOL)
I then added some words of the song and some pictures of skyscrapers and the good lady herself. All of this was added to an 8x8 card the background I had inked through the mask and also used the shimmer spray.
Happy Memories.... now hope you're sing the song along with old blue eyes himself.
Happy Splodging
Susan x

Friday 6 July 2012

Something Useful


Please note this post will stay at the Top of the blog .... additional new postings will appear below.

 
We a putting out a DT call for papercrafters and scrappers to join the SplodgeAway Design Team. We are looking for people with a creative committment who can submit 3 projects a month and when required additional trade samples.

What you need to do is send the following information to annette.lee@splodgeaway.com

  • Full name, address, email address
  • A short biography on why you would like to be part of the SplodgeAway Desigm Team
  • Links to your online blog
  • A List of any other Design Teams you have been with or are still with
  • Submit 4 photos of your work. The projects must show that SplodgeAway has been used for the majority of the projects. One project must include a tutorial write up
The closing date is 20 July and winners will be notified by the end of July

Best of Luck

Annette
DT Co-ordinator

****************************************************************************
 

Something Useful


Project By Sam Crowe

This week the SplodgeAway DT were asked to do a colouring project. Well, I racked my brains, this should have been easy for me, I love colour, I got a Distinction in colour in my Interior Design course.... I SplodgeAway ALL the time!!! BUT NO, NOTHING CAME TO ME? Then I realised I was putting myself under too much pressure. Colour is everywhere, Suzicraft sell some gorgeous Distress Inks, Adirondack Inks, Cosmic Shimmers. beautiful coloured card and paper, everything you need, and I have most of it! But you don't have to try to use it all at once. A little mix up here and there is great, or just using separate mediums on their own often produces some lovely effects.


I decided to make something useful. I didn't have to even think about the project because everything I do has colour in it, my SplodgeAway mat never leaves my side!! So this is it, A peg stuck to the back back of a lovely stamped image (well I think so) a good old Splodge of colour with my distress inks, a bit of colouring with my Spectrum Noirs and a splash of Cosmic Shimmer on the pegs and there you have it - A note holder, a book mark or simply a little something to keep your receipts together in your handbag. Simple, Pretty!


Thanks for Stopping By

Sam x

Wednesday 4 July 2012

Splodge n' Distress It plus DT Call


Splodge n' Distress It


Project By Annette Lee

As part of our 'colour' week here at SplodgeAway I thought I'd share a project I've actually made as part of out upcoming free Demo Weekend on Sat 28th July - so if you're about please come and see us. For this project I used the ever invaluable SplodgeAway Mat to create my own paint palette to scribble inks onto, add a spritz of water, mix and use as a watercolour paint to add hint and tones of colour into some beautiful Kay & Co papers. The stamped background and focal points were stamped onto Easy Ink card and then watercoloured and distressed. 


Colours Used: Tattered Rose / Worn Lipstick / Crushed Olive / Forest Moss / Scattered Straw
Stamps are from Creative Expressions
All Products are available from Suzicraft


In my opinion the SplodgeAway Mat is great to use as a palette because you can actually see the colours you are laying down due to the colour of the mat - have fun!

Hope to see you at the Demo Day

TFSB

Annette x

Monday 2 July 2012

'Colour It!'

'Colour It' by Karen Wright

The theme this week is all about colour and how we achieve it. That doesn’t just mean using your pens to colour in cute images (although I will admit that’s one of my favourite pastimes.
I’ve used colour in the form of inkpads.


PROJECT BY KAREN WRIGHT

Firstly I took my SplodgeAway mat  and cut a piece of SplodgeAway easy ink card, I added a little distress inks (peacock feathers and squeezed lemonade) onto the mat and picked up the ink with a brayer then applied to the easy ink card.


Using black memento I inked up a crafty individuals stamp and stamped it on the cardstock I had previously coloured. I matted this onto brown spotted card.
I then cut some teal card and distressed all the edges with walnut stain on the SplodgeAway mat, I also cut the teal card for my sentiment which is by creative expressions.

After the card was assembled I added glossy accents and liquid pearls in a dot formation again adding interest and a little more colour dimension.


TFL
Karen x

Sunday 1 July 2012

SplodgeAway Design Team Call

Please note this post will stay at the Top of the blog .... additional new postings will appear below

This is going to be an AMAZING week for us here at SplodgeAway. Firstly let me tell you that 'SplodgeAway' is making it's first appearance on Create And Craft on  Thurs around 12 noon with Maria Simms and Mr SplodgeAway himself.... but more on that later in the week

Today we a putting out a DT call for papercrafters and scrappers to join the SplodgeAway Design Team. We are looking for people with a creative committment who can submit 3 projects a month and when required additional trade samples.

What you need to do is send the following information to annette.lee@splodgeaway.com

  • Full name, address, email address
  • A short biography on why you would like to be part of the SplodgeAway Desigm Team
  • Links to your online blog
  • A List of any other Design Teams you have been with or are still with
  • Submit 4 photos of your work. The projects must show that SplodgeAway has been used for the majority of the projects. One project must include a tutorial write up
The closing date is 20 July and winners will be notified by the end of July

Best of Luck

Annette
DT Co-ordinator